Quantcast
Channel: News – Tips on Ubuntu
Viewing all 207 articles
Browse latest View live

Avidemux Video Editor 2.6.18 Released with Some Fixes

$
0
0
Avidemux Qt 5

Avidemux, a free and open-source video editor written in C++, has reached the 2.6.18 release a few days ago with some fixes.

Avidemux 2.6.18 is the first release in 2017 that features:

  • Fix auto resize when video has ~ same dimension as screen *
  • Fix multiple preview breaking navigation
  • Fix slider and tooltips
  • Mp4/Mp4v2: Allow E-AC3

How to install Avidemux 2.6.18 in Ubuntu:

The getdeb repository is maintaining the latest Avidemux packages and so far available for Ubuntu 16.10, Ubuntu 16.04, and derivatives.

1. To add the repository, simply run the following command in terminal (Ctrl+Alt+T):

sudo sh -c 'echo "deb http://archive.getdeb.net/ubuntu xenial-getdeb apps" >> /etc/apt/sources.list.d/getdeb.list'

In the code,replace xenial (for 16.04, Linux Mint 18) with yakkety for Ubuntu 16.10.

GetDeb repository for Ubuntu 16.04

Then install the key:

wget -q -O- http://archive.getdeb.net/getdeb-archive.key | sudo apt-key add -

2. After added the repository, search for and install avidemux2.6-qt package in Synaptic Package Manager.

Or just run the following command in terminal to install / upgrade it:

sudo apt update && sudo apt install avidemux2.6-qt

Uninstall:

To uninstall the software, either use Synaptic Package Manager or run the following command in terminal:

sudo apt remove avidemux2.6-qt && sudo apt autoremove

And the getdeb repository can be removed via System Settings -> Software & Updates -> Other Software.

The post Avidemux Video Editor 2.6.18 Released with Some Fixes appeared first on Tips on Ubuntu.


[Quick Tip] ‘Low Graphics Mode’ Option to Land in System Settings

$
0
0
Unity 7 Low Graphics Mode

For the new Unity 7 low graphics mode, Ubuntu will soon made it easy to enable or disable this feature using unity-control-center (System Settings -> Appearance -> Behavior).

The desktop team improved the Unity 7 low graphics mode a few months ago by reducing the amount of visual effects that are seen while running in low gfx. Now a toggle option for the new (fast) low gfx will be land in System Settings soon:

The change is under review, it might take some weeks to be released in Ubuntu and be slightly modified at the end!

However, for those still have the old lower-performance lowgfx, the option will be grayed out, the developer explained in his blog post:

If you can’t select “Switch to low graphics mode” it means that you still have the old lower-performance lowgfx and you can only switch to it from ccsm->unityshell->low gfx, if you are able to select it, you just check/uncheck the button to enable/disable the new features and don’t need to use ccsm at all. 🙂

The post [Quick Tip] ‘Low Graphics Mode’ Option to Land in System Settings appeared first on Tips on Ubuntu.

Free Batch Image Processor ‘Converseen’ Adds ImageMagick 7 Support

$
0
0
Converseen Image Processor

Converseen, a free open-source batch image processor for Windows and Linux, has reached the 0.9.6 release with ImageMagick 7 support, though Ubuntu still offers 6.x in its main archives.

Converseen allows you to convert, resize, rotate and flip an infinite number of images with a mouse click. Moreover, it is able to transform an entire PDF file into a bunch of images with the characteristics you prefer: you can choose one of the 100+ formats, you can set the size, resolution and the filename.

The software is written in C++ with Qt5 framework. Thanks to ImageMagick, it supports more than 100 image formats including DPX, EXR, GIF, JPEG, JPEG-2000, PhotoCD, PNG, Postscript, SVG, TIFF and many others.

How to Install Converseen in Ubuntu:

The software is available in Ubuntu main repositories by default. But to get the latest release, you can use this unofficial PPA repository, which contains the packages for Ubuntu 16.10, Ubuntu 16.04, Ubuntu 14.04, and their derivatives.

And below is how to add the PPA, and install / upgrade to the latest Converseen:

1. Open terminal (Ctrl+Alt+T) and type in the command below:

sudo add-apt-repository ppa:ubuntuhandbook1/apps

Type in password (no visual feedback) when it prompts and hit Enter.

converseen-ppa

2. Then update and install the image processor via commands:

sudo apt-get update

sudo apt-get install converseen

If you like the software, you may keep the PPA so once a new release is out you can upgrade it along with other system updates via the Software Updater utility.

upgrade converseen via software updater

Uninstall Converseen:

To uninstall the image processor, either use Ubuntu Software App or run the command below in terminal:

sudo apt-get remove converseen && sudo apt-get autoremove

And the PPA can be removed by going to System Settings -> Software & Updates -> Other Software tab.

The post Free Batch Image Processor ‘Converseen’ Adds ImageMagick 7 Support appeared first on Tips on Ubuntu.

New Linux Driver Series ‘NVIDIA 378.09’ Beta Released

$
0
0
NVIDIA

NVIDIA Driver for Linux has reached the new short-lived 378 series by releasing NVIDIA 378.08 Beta a few days ago.

Here’s the changes since NVIDIA 375.26:

  • Added support for the following GPU(s):
    • Quadro M1200
    • Quadro M2200
  • Added support for the ARB_parallel_shader_compile extension to allow multi-threaded compilation of GLSL shaders.
  • Updated the X driver to ignore any Virtual Reality Head Mounted Displays (HMDs). See the “AllowHMD” X configuration option in the README for details.
  • The driver will now advertise GLX FBConfigs with no depth bits on depth 30 X screens.
  • Added support in nvidia-settings to view configured PRIME displays. To enable PRIME displays, see “Offloading Graphics Display with RandR 1.4” in the README.
  • Added infrastructure which enables the NVIDIA EGL driver to load EGL external platform libraries that add client-side support for new window systems, beyond the existing libnvidia-egl-wayland.so.1. For more details, see:
    • https://github.com/NVIDIA/eglexternalplatform
    • https://github.com/NVIDIA/egl-wayland
  • Added support for the following Vulkan extensions:
    • VK_KHR_display
    • VK_KHR_display_swapchain
  • Enabled OpenGL threaded optimizations by default in the driver. Refer to the “Threaded Optimizations” section in the “Specifying OpenGL Environment Variable Settings” chapter of the README for details. These optimizations will self-disable when they are degrading performance. As a result, performance should be unchanged for many applications, and increased for those that benefit from threaded optimizations and were not already forcing them enabled.
  • Fixed a bug that caused hangs when using the NVIDIA driver on 32-bit x86 systems running older Linux kernel versions (e.g. 2.6.18).

Download & Install NVIDIA Driver in Ubuntu:

For the official .run binary packages, go to the link below:

NVIDIA Unix Driver

Select download the package matches your OS type, and give its executable permission from the file’s Properties window (Permissions tab), and finally execute the file in command console.

To make the installation easy, “Graphics Drivers” team PPA offers current Nvidia driver series packages for all current Ubuntu releases.

Just add the PPA via the following command in terminal(Ctrl+Alt+T):

sudo add-apt-repository ppa:graphics-drivers/ppa && sudo apt update

Nvidia Driver PPA

Then you’ll be able to install NVIDIA proprietary drivers via Additional Drivers utility (378 series not available at the moment, check the PPA link):

install nvidia 375.20

Troubleshoot:

For some cards, there may be a black screen issue after installing NVIDIA proprietary GPU drivers. Try either setting NOMODESET in grub option, or removing the proprietary driver via command:

sudo apt-get purge nvidia-current

You may boot into recovery mode -> root prompt, or press Ctrl+Alt+F1 on login screen to get into command console.

The post New Linux Driver Series ‘NVIDIA 378.09’ Beta Released appeared first on Tips on Ubuntu.

SMPlayer 17.1 Released with Chromecast Support

$
0
0
smplayer-chromecast

The SMPlayer media player has reached the 17.1.0 release one day ago with new feature experimental support for Chromecast.

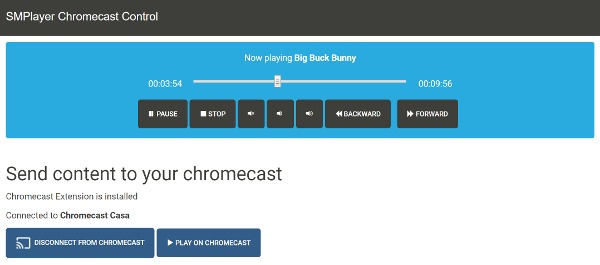
Just play a video in SMPlayer, then click the ‘Play on Chromecast’ option from the Play menu. A web page will be opened in your web browser, which will get the URL of the video. This web page can communicate with your Chromecast device. You’ll find options to connect/disconnect, start playback and controls for play, pause, volume, seek…

chromecast-control

Requirement:

  • SMPlayer 17.1
  • Google Chrome or Chromium with Google Cast extension installed.
  • webfs, a tiny web server that SMPlayer will run to serve local files (install it via command sudo apt install webfs)

Other changes in SMPlayer 17.1:

  • Support for some of the #EXTVLCOPT options in m3u/m3u8 playlists. This may help to play online streams from playlists intended for VLC.
  • New options in the context menu of the playlist: ‘copy URL to clipboard’, ‘open source folder’ and ‘play on Chromecast’.
  • Option to display bitrate information in the status bar.
  • Possibility to display the playback time with milliseconds in the status bar.
  • The option to add black borders on fullscreen is back (Preferences -> General -> Video).
  • The option in the playlist to delete files from the disk has been removed.

How to Install SMPlayer 17.1 in Ubuntu:

For Ubuntu 16.10, Ubuntu 16.04, Ubuntu 14.04, Ubuntu 12.04, and their derivatives, you can install or upgrade to the latest SMPlayer release using its official PPA repository.

1. To add the PPA, open terminal (Ctrl+Alt+T) and run the command:

sudo add-apt-repository ppa:rvm/smplayer

Type in password (no visual feedback) when it prompts and hit Enter.

SMPlayer PPA

For those who prefer Qt4 version, use the new PPA instead:

sudo add-apt-repository ppa:rvm/smplayer-qt4

2. Then you can upgrade SMPlayer using Software Updater utility:

upgrade smplayer

Or install the player via commands:

sudo apt-get update

sudo apt-get install smplayer smtube smplayer-themes smplayer-skins

Uninstall:

You can restore SMPlayer to the stock version available in Ubuntu main archive by using ppa-purge:

sudo apt-get install ppa-purge && sudo ppa-purge ppa:rvm/smplayer

The post SMPlayer 17.1 Released with Chromecast Support appeared first on Tips on Ubuntu.

HandBrake 1.0.2 Released with Several Fixes [how-to-install]

$
0
0
handbrake-video-transcoder

The second bug-fix release for HandBrake video transcoder 1.0 series has been released one days ago with various video, audio, subtitles fixes, and Linux, Windows, Mac platforms fixes.

HandBrake 1.0.2 changelog:

  • Video
    • Fixed point to point encoding end point when using frames as the unit
    • Improve error handling for libdvdread and libavcodec decoders
  • Audio
    • Fixed an issue where fallback encoder bitrate was not set properly
  • Subtitles
    • Fixed incorrect duration for UTF-8 subtitles
    • Fixed an issue causing extra blank lines for UTF-8 subtitles in MKV
  • Linux
    • Fixed an issue sometimes preventing dragging and dropping of presets between folders
    • Miscellaneous bug fixes
  • See here for more details.

How to Install HandBrake 1.0.2 in Ubuntu:

For Ubuntu 16.10, Ubuntu 16.04, Ubuntu 14.04, and their derivatives, e.g., Linux Mint 17 & 18, the new release will soon be made into its official PPA.

Follow the steps to add the PPA and install / upgrade HandBrake:

1. Open terminal (Ctrl+Alt+T) and run command to add PPA:

sudo add-apt-repository ppa:stebbins/handbrake-releases

Type in password (no visual feedback) when it prompts and hit Enter.

handbrake ppa for xenial

2.To upgrade from a previous release, launch Software Updater (Update Manager) and install available updates after checking for updates.

upgrade handbrake in Ubuntu

Or just run command to install / upgrade the software:

sudo apt-get update

sudo apt-get install handbrake-gtk

Tip: If you’ve installed handbrake from Ubuntu Software App, remove it first before installing the new developer’s build from PPA.

Uninstall:

To remove handbrake 1.0.2, simply run following command in terminal:

sudo apt-get remove handbrake-gtk && sudo apt-get autoremove

And you can remove the PPA repository by launching Software & Updates utility and going to Other Software tab.

The post HandBrake 1.0.2 Released with Several Fixes [how-to-install] appeared first on Tips on Ubuntu.

Install the Latest Remmina 1.2.0 in Ubuntu 16.04, 16.10

$
0
0
Remmina 1.2.0

For those who want to install the latest Remmina 1.2.0, the default GTK+ remote desktop client, a core developer has made the new Remmina Snap app for Ubuntu 16.04, Ubuntu 16.10, and higher.

Remmina is a free and open-source remote desktop client written in GTK+, aiming to be useful for system administrators and travellers, who need to work with lots of remote computers in front of either large monitors or tiny netbooks. Remmina supports multiple network protocols in an integrated and consistant user interface.
Currently RDP, VNC, SPICE, NX, XDMCP and SSH are supported.

If you’ve never installed a SNAP app in Ubuntu, you need to first install the core package snapd by running the command below in terminal (Ctrl+Alt+T):

sudo apt install snapd

So you can easily launch Ubuntu Software App and search for Remmina. Besides the original installed version, you’ll see a new Remmina package from Ubuntu Snappy Store.

Install Remmina Snap App

Click install it and you’re done. For command line, you can use the following command to install the client:

sudo snap install remmina

NOTE: The Snap app in Ubuntu Desktop is currently not perfect, it may not respect your GTK and/or icon theme.

Don’t like the Snap app? For Ubuntu 14.04, Ubuntu 16.04, Ubuntu 16.10, and derivatives, there’s also Remmina Next PPA that contains the latest DEB packages.

1. Remove the snap app via Ubuntu Software, then open terminal (Ctrl+Alt+T) and run command to add the PPA:

sudo add-apt-repository ppa:remmina-ppa-team/remmina-next

Type in password (no visual feedback) when it prompts and hit Enter.

Remmina Next PPA

2. Then you can upgrade the original version of the software to the latest via Software Updater utility.

upgrade remmina client [h4]Uninstall:[/h4]

To get rid of the PPA repository and restore to the shipped version of Remmina in Ubuntu, use ppa-purge tool via command:

sudo apt install ppa-purge && sudo ppa-purge ppa:remmina-ppa-team/remmina-next

The post Install the Latest Remmina 1.2.0 in Ubuntu 16.04, 16.10 appeared first on Tips on Ubuntu.

The Alpha 2 of Ubuntu 17.04 Zesty Zapus Released

$
0
0
zapus_hudsonius

The second alpha of Ubuntu 17.04 Zesty Zapus has been released today, features images for Lubuntu, Kubuntu, Ubuntu MATE, Ubuntu Kylin, Ubuntu GNOME, and Ubuntu Budgie.

Pre-releases of the Zesty Zapus are not encouraged for anyone needing a stable system or anyone who is not comfortable running into occasional, even frequent breakage. They are, however, recommended for Ubuntu flavor developers and those who want to help in testing, reporting and fixing bugs as we work towards getting this release ready.

This pre-release ships with Linux Kernel 4.9, LibreOffice 5.2, Firefox 50, and features:

Lubuntu 17.04 Alpha 2:

  • An LXQt image is still being worked on, please be patient.
  • Various different LXDE packages have been updated

Download Lubuntu 17.04

Kubuntu 17.04 Alpha 2:

  • Plasma Desktop 5.8
  • KDE Applications 16.12.1

Download Kubuntu 17.04

Ubuntu Gnome 17.03 Alpha 2:

  • GNOME 3.22 with a few apps still at GNOME 3.20 versions.
  • Flatpak 0.8 and Ubuntu Snap (snapd) installed by default.
  • The chrome-gnome-shell system helper is installed by default.
  • The tracker search indexing engine is now sandboxed.
  • gnome-icon-theme and several other apps are no longer installed for new installs.

Download Ubuntu Gnome 17.04

Ubuntu Budgie 17.04 Alpha 2:

  • latest budgie-desktop stable release v10.2.9.
  • latest budgie-welcome app with our browser ballot screen
  • AppIndicator support is now default
  • Terminix is the default terminal
  • Many new GNOME based applications are included by default

Download Ubuntu Budgie 17.04

Ubuntu MATE 17.04 Alpha 2:

  • MATE Desktop 1.17.2
  • Features full support of libinput
  • mate-panel now supports desktop actions.
  • Dropped PowerPC
  • The .iso images are approximately 200MB smaller.

Download Ubuntu MATE 17.04

UbuntuKylin 17.04 Alpha 2:

Fixed many internationalization and localization bugs in Ubuntu itself and bugs in software written by the Ubuntu Kylin team.

Download UbuntuKylin 17.04

Future Releases of Ubuntu 17.04:

February 16th Feature Freeze
February 23rd Beta 1 (for opt-in flavors)
March 23rd Final Beta
April 6th FinalFreeze, Release Candidate
April 13th Final release of Ubuntu 17.04

via: Ubuntu News

The post The Alpha 2 of Ubuntu 17.04 Zesty Zapus Released appeared first on Tips on Ubuntu.


How to Install LibreOffice 5.3 in Ubuntu 16.04, 14.04

$
0
0
LibreOffice 5.3

LibreOffice 5.3, a new stable series of the open-source office suite, will be released on February 1. The official binaries are available for download. And Ubuntu PPA will build the packages soon.

What’s New in LibreOffice 5.3:

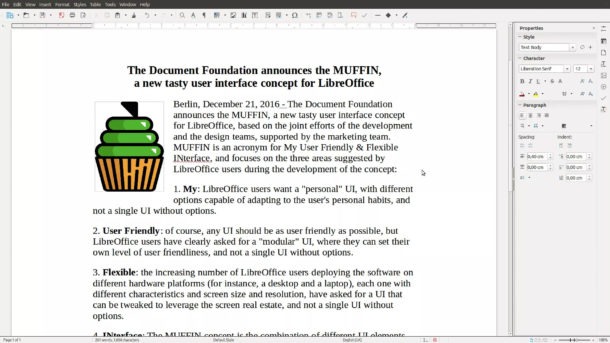
  • Many UI/UX improvements and the MUFFIN interfaces (Microsoft Ribbon UI)
  • First source release of LibreOffice Online, that offers basic collaborative editing of documents in a browser
  • Faster rendering performance
  • New text layout engine
  • And much more, see the release note.
LibreOffice Writer with Sidebar

How to Install LibreOffice 5.3 in Ubuntu / Linux Mint

Although LibreOffice website offers official DEB binaries, the best way to install or upgrade to LibreOffice 5.3 in Ubuntu 16.10, Ubuntu 16.04, Ubuntu 14.04, and Linux Mint 17 & 18 is using the LibreOffice Fresh PPA.

Once the PPA updated with the new packages, follow the steps below to install it:

1. Open terminal (Ctrl+Alt+T) and run command to add the PPA:

sudo add-apt-repository ppa:libreoffice/ppa

Type in your password when it prompts and hit Enter.

LibreOffice Fresh PPA

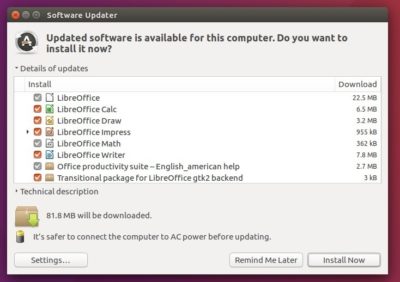
2. After that, launch Software Updater (Update Manager) and after checking for updates you’ll see new release of LibreOffice packages available:

upgrade LibreOffice office suite

How to Downgrade

To uninstall the new LibreOffice release and downgrade to the original version available in Ubuntu main repository, open terminal and run command:

sudo apt-get install ppa-purge && sudo ppa-purge ppa:libreoffice/ppa

The post How to Install LibreOffice 5.3 in Ubuntu 16.04, 14.04 appeared first on Tips on Ubuntu.

KDE Plasma Desktop 5.9 Released

$
0
0
KDE Plasma 5.9

The KDE Plasma Desktop 5.9 was released one day ago with exciting new features. And the KDE Team announced that they will continue to provide bugfixes to Plasma 5.8 LTS.

What’s New in KDE Plasma 5.9:

  • Interactive previews to notifications.
  • Drag and drop improvements throughout the desktop.
  • Switch between windows in Task Manager using Meta + number shortcuts.
  • A new applet to group multiple widgets together in a single widget.
  • The look and feel improvements of the desktop and applications.
  • Global Menus have returned.
  • More powerful Look and Feel import & export
  • New network configuration module
  • continued working on Wayland support.

See the announcement and the below video for more:

Download & install Plasma 5.9:

Kubuntu Backports PPA still contains the 5.8.x LTS packages so far, and it can take some days to make the new release into the PPA.

For the source tarballs, grab them from the link below:

Download KDE Plasma Source

The post KDE Plasma Desktop 5.9 Released appeared first on Tips on Ubuntu.

Shotcut Video Editor 17.02 Released! [How-to-install]

$
0
0
shotcut video editor

Shotcut, a free and open-source video editor, has reached the 17.02 release one day ago. Here’s how to install it in Ubuntu 16.10.

Shotcut is a cross-platform video editor developed on the MLT Multimedia Framework. Major features include support for a wide range of formats. No import required meaning native timeline editing. Blackmagic Design support for input and preview monitoring. And resolution support to 4k.

Changes in Shotcut 17.02:

  • Fixed drag-n-drop from other than C: drive on Windows.
  • Fixed ‘/’ getting added to front of file paths on Windows.
  • Fixed the MLT XML repair tool not correctly handling decimal point in some configurations.
  • Fixed opening a network stream.
  • Improved support for image sequences.
  • Improved device capture.
  • Added Slovenian translation.

How to Install Shotcut 17.02 in Ubuntu:

The GetDeb repository contains the latest Shotcut packages, so far available only for Ubuntu 16.10.

1. To add the repository, open terminal (Ctrl+Alt+T) and run command:

sudo sh -c 'echo "deb http://archive.getdeb.net/ubuntu yakkety-getdeb apps" >> /etc/apt/sources.list.d/getdeb.list'

Type in your password when it prompts and hit Enter. Replace xenial with yakkety for Ubuntu 16.10 in the code shown in picture

GetDeb repository for Ubuntu 16.04

Then install the key via command:

wget -q -O - http://archive.getdeb.net/getdeb-archive.key | sudo apt-key add -

2. After that, install the editor either via Synaptic Package Manager, or just run following commands one by one:

sudo apt update

sudo apt install shotcut

Uninstall:

To remove Shotcut video editor, either use Synaptic Package Manager or run the command below in terminal:

sudo apt remove shotcut && sudo apt autoremove

And you can remove the GetDeb repository via Software & Updates utility (Other Software tab).

The post Shotcut Video Editor 17.02 Released! [How-to-install] appeared first on Tips on Ubuntu.

GIMP 2.8.20 Stable Released! [Ubuntu PPA]

$
0
0
GIMP 2.8

A new stable release for the GIMP 2.8 series, GIMP 2.8.20, has been released a few days ago with various bug-fixes.

GIMP 2.8.20 features the fix to the weird initial user interface language selection on mac OS. Also, an annoying oscillating switching between different input devices has been fixed in Windows platforms.

GIMP 2.8.20 changelog:

  • Avoid D-Bus error message when built without D-Bus support
  • fix OS X min required conditional in gimpimagewindow.c
  • Saving to existing .xcf.bz and .xcf.gz files didn’t truncate them and could lead to unnecessarily large files
  • Text layer created by gimp-text-fontname doesn’t respect border when resized
  • Flow on Paint Dynamics editor dialog: the ‘y’ axis is indicating ‘Rate’ instead ‘Flow’
  • Vertical ruler shows artifacts if the status bar isn’t showing
  • Tablet stylus misbehaves when crossing the edge of a dock in multi-window-mode
  • Disable the new “automatic window tabbing” feature introduced on mac OS Sierra
  • Improve the visiblity of slider handles with dark themes
  • Make it harder to switch to renaming if selecting already selected items in resource lists
  • make toggling to color picker mode of paint tools more robust
  • call gimp_file_entry_set_filename() with filename encoding
  • Translation updates, plug-in fixes and various other fixes.

How to Install GIMP 2.8.20 in Ubuntu:

For Ubuntu 12.04, Ubuntu 14.04, Ubuntu 16.04, Ubuntu 16.10, and derivatives. An unofficial PPA is available and the maintainer promised to maintain the PPA as long as he live, although the PPA is not updated at the moment of writing this, check the link.

Check the link above to make sure the new release available in PPA before following the steps below:

1. To add the PPA, open terminal (Ctrl+Alt+T) and run command:

sudo add-apt-repository ppa:otto-kesselgulasch/gimp

Type in password when it prompts and hit Enter.

GIMP PPA

2. Then launch Software Updater (or Update Manager) and you’ll be able to upgrade the editor after checking for updates:

upgrade gimp image editor

Uninstall:

Simply run the command below in terminal to purge the PPA will remove the repository and downgrade GIMP to the stock version in your Ubuntu repository as well:

sudo apt install ppa-purge && sudo ppa-purge ppa:otto-kesselgulasch/gimp

The post GIMP 2.8.20 Stable Released! [Ubuntu PPA] appeared first on Tips on Ubuntu.

QupZilla Web Browser 2.1.0 Released! (64-bit AppImage)

$
0
0
QupZilla

QupZilla, a lightweight QtWebEngine browser, has reached a new major 2.1 release one day ago with lots of fixes and some new features.

QupZilla 2.1.0 brings back some features present in 1.8 version and also a number of completely new features.

  • bring back spellcheck
  • bring back support for printing
  • bring back save page action + support multiple formats
  • bring back option to delete cookies on close
  • bring back per-domain user agent settings
  • show audio playing indicator in tab with possibility to mute
  • show background activity indicator in pinned tabs
  • add option to show navigation bar when opening new tab in fullscreen
  • add option to show bookmarks toolbar when typing in location bar
  • add option to use native scrollbars
  • add option to delete cache on close
  • each tab has now its own search toolbar
  • lot of HighDPI fixes
  • fix setting maximum size of cache
  • fix scrolling with high resolution mouse/touchpad
  • fix rules for disabling blocking on pages in AdBlock
  • fix deleting cookies
  • fix slow search in icons database
  • fix restoring zoom level of tabs
  • fix crash when opening web inspector
  • fix crash of the application when render process crashes
  • fix tabbar being invisible sometimes after leaving fullscreen
  • fix sometimes not showing list of windows and tabs in recovery page
  • Windows: show download progress in taskbar

Download QupZilla for Linux:

QupZilla 2.1.0 requires Qt5 >=5.7. It’s not easy to build it on current Ubuntu releases since Ubuntu repositories provide Qt 5.6 and older versions.

1. Fortunately, QupZilla offers AppImage for 64-bit Linux, it contains all the files the browser need to run:

Download QupZilla AppImage

2. After downloaded the file, make it executable by:

  • right-click on the AppImage file and select Properties.
  • then navigate to the Permissions tab.
  • finally check the box that says “Allow executing file as program”

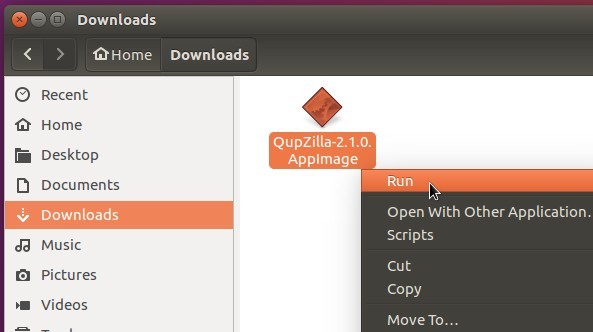
3. Finally you can launch QupZilla by right-clicking on the AppImage and select ‘Run’:

run-qupzilla-appimage

If you don’t see the ‘Run’ option, go to menu of Nautilus file browser Edit -> Preferences -> Behavior -> Check the line says “Run executable text files when they are opened”.

The post QupZilla Web Browser 2.1.0 Released! (64-bit AppImage) appeared first on Tips on Ubuntu.

Opera 43 Released, Make Web Pages Load Faster

$
0
0
Opera Web Browser

The Opera web browser has reached the new stable 43 release earlier today, the fastest version ever, brings instant page loading and Profile Guided Optimization (PGO).

What’s New in Opera 43:

  • Instant page loading is a new feature makes Opera predict which website you’re typing the address for. Once recognized, it begins loading the site in the background even before you hit enter. It becomes smarter over time by remembering user behavior.
  • Profile Guided Optimization (PGO) is a compiler technique able to make software running on Windows significantly faster.
  • Classic link selection feature that is able to:
    • Use horizontal click-and-drag to select the text.
    • Use vertical click-and-drag to drag the link.

Download & Install Opera 43 in Ubuntu:

Go to the link below and click download the DEB binary package:

Download Opera for Linux

Then click install the file via Ubuntu Software App, or use sudo dpkg -i packagename.deb command in terminal.

For those who have a previous release installed, you can easily upgrade Opera using Software Updater utility after added Opera for Linux repository:

upgrade Opera browser

Don’t have the Opera repository enabled? Open terminal (Ctrl+Alt+T) and run following commands to add it:

1. Add Opera for Linux repository via command:

sudo sh -c 'echo "deb https://deb.opera.com/opera-stable/ stable non-free" >> /etc/apt/sources.list.d/opera-stable.list'

opera stable repository

2. Then setup the key:

wget -O - http://deb.opera.com/archive.key | sudo apt-key add -

The post Opera 43 Released, Make Web Pages Load Faster appeared first on Tips on Ubuntu.

Vivaldi 1.7 Released with Built-in Screen Capture Tool

$
0
0
Vivaldi screen capture

The Vivaldi web browser has reached the 1.7 stable release one day ago, features a built-in screen capture tool.

With Vivaldi 1.7, you can easily take a screenshot of full webpage or selection area using the camera icon from the Status Bar or with F2/⌘E quick commands and typing “Capture”.

Screenshot can be saved on your disk or stored to clipboard to be able to share it by simply pasting it into an application.

Another feature, the ‘Notes’ icon in the Side Panel now has options to capture selected areas of websites and add them to Notes.

Other Features in Vivaldi 1.7:

  • Mute All Tabs by calling up quick commands with F2/⌘E and type “Mute”.
  • Mapped keyboard shortcuts for screenshots.
  • Configurable lazy loading for pinned tabs.
  • Native macOS notifications.
  • Addition of StartPage private search engine
  • Configurable top-level domain expansion.
  • Toggle extensions visibility option in the address bar.
  • Improved keyboard menu access on Windows/Linux for Chinese, Japanese and Korean users.

Download & Install Vivaldi in Ubuntu / Linux Mint:

Go to the official download link below and grab the DEB package:

Vivaldi Download Page

Then click install the DEB package via Ubuntu Software App, or run command (Ctrl+Alt+T) in terminal:

sudo dpkg -i ~/Downloads/vivaldi-stable*.deb

Installing the DEB package will add the Vivald Linux repository into your system.

vivaldi-repository

So you can easily upgrade the browser from an existing release via the Software Updater (or Update Manager) utility, along with other system updates.

The post Vivaldi 1.7 Released with Built-in Screen Capture Tool appeared first on Tips on Ubuntu.


SMPlayer 17.2 Released with YouTube Fix [How-to-Install]

$
0
0
SMPlayer delete file from disk

The SMPlayer media player has reached the 17.2 release a few days ago. Here’s how you can install it in Ubuntu and/or Linux Mint.

SMPlayer 17.2 is a small release with following changes:

  • Fix for YouTube
  • The option to delete files from the disk in the playlist is back (enable it in Preferences -> Playlist -> Misc)
  • The Linux package now include a different web server to serve files for Chromecast. webfs is not needed any more.
  • Add new Norwegian Bokmål translation.

How to Install SMPlayer 17.2 in Ubuntu / Linux Mint:

For Ubuntu 12.04, Ubuntu 14.04, Ubuntu 16.04, Ubuntu 16.10, Linux Mint 17 & 18, and derivatives, you can easily install the latest SMPlayer from the PPA repository.

1. Open terminal from app launcher or via Ctrl+Alt+T shortcut key. When it opens, run command to add the PPA:

sudo add-apt-repository ppa:rvm/smplayer

Type in your password when it prompts and hit Enter.

SMPlayer PPA

2. If you have a previous release installed, launch Software Updater (or Update Manager) and upgrade the software after checking for updates:

upgrade smplayer

Or run following commands to install / upgrade SMPlayer:

sudo apt-get update

sudo apt-get install smplayer smtube smplayer-themes smplayer-skins

Uninstall:

To remove SMPlayer 17.2 and restore to the original versions provided in Ubuntu main repositories, purge the PPA by running the command in terminal:

sudo apt-get install ppa-purge && sudo ppa-purge ppa:rvm/smplayer

The post SMPlayer 17.2 Released with YouTube Fix [How-to-Install] appeared first on Tips on Ubuntu.

Mesa 17.0.0, the first year-based version, has been released

$
0
0
clipart-video-card

Mesa 17.0 has been announced yesterday at noon with OpenGL 4.5 capability, many big changes and improvements.

Mesa 17.0.0 is the first release with the new year-based versioning system. Mesa-dev announced:

As some of you have noticed we’ve skipped the 14-16 releases all together.

Since Mesa has reached OpenGL 4.5 capability, as of Mesa 13.0.0, we decided to make a small change in versioning scheme: Previously the major number was bumped as we reach the next GL version. Now it is bumped to reflect the year.

Thus a number of 17.2.5 indicates the third Mesa series of 2017, fifth bugfix release.

Mesa 17.0.0 release highlights:

Vulkan drivers:

  • Correctly return (and implement) VK_INCOMPLETE on multiple WSI queries
  • Support for the VK_KHR_sampler_mirror_clamp_to_edge extension
  • We now use the Khoronos vk.xml file to generate the entrypoints

ANV:

  • HiZ and performance improvements
  • Float64 support and tessellation shader support.

RADV:

  • Support multiple devices
  • Support for the VK_AMD_draw_indirect_count extension
  • Support for the VK_AMD_negative_viewport_height extension

EGL:

  • Android: Use gralloc::lock_ycbcr for resolving YUV formats
  • Android: Support for pbuffer surfaces

Mesa core:

  • Noticeable refactoring en route to GLSL Shader Cache
  • Groundwork for int64

i965:

  • OpenGL 4.5 support on Haswell hardware
  • Reuse the same BLORP and ISL code as the ANV driver

Gallium:

  • HUD: A number of race issues and memory leaks were resolved.

etnaviv:

  • New driver for Vivante GPU IP

freedreno

  • Support for a5xx

nouveau:

  • OpenGL 4.3 support on Maxwell hardware
  • Improved performance due to instruction pipelining (Maxwell)

r600/radeonsi:

  • VCE: Handle H.264 level 5.2
  • Polaris12 support
  • Dozens of performance improvements

Clover:

  • Implement clGetExtensionFunctionAddressForPlatform.
  • Add missing clGetDeviceInfo CL1.2 queries

VDPAU:

  • Use dri3 to directly send the buffer to X

Build:

  • Building RADV requires –enable-gallium-llvm
  • Compatibility fixes for building mesa as part of ARC
  • The vulkan headers vk_platform.h and vulkan.h are no longer installed
  • A couple of configure options (–with-sha1 and –disable-shader-cache) are removed alongside their respective library requirements

Download / Install Mesa 17.0 in Ubuntu:

The source tarball is available for download at the link below:

Download Mesa Sources

Ubuntu 17.04 will ship with Mesa 17.0 by default.

The xorg-edgers fresh X crack PPA also contains the packages for Ubuntu 16.04 and Ubuntu 16.10. (READ THE PPA DESCRIPTION AND USE IT AT YOUR OWN RISK!).

For less fresh (the last 13.0.4 so far), more stable builds, use this PPA instead.

The post Mesa 17.0.0, the first year-based version, has been released appeared first on Tips on Ubuntu.

NVIDIA Driver 378.13 Released, Allow to View Configured PRIME Displays

$
0
0

The latest short-live Nvidia Linux driver branch has reached the 378.13 release. Features new GPUs support, xorg-server 1.19 support, ability to view configured PRIME displays in nvidia-settings, other features and various fixes.

NVIDIA 378.13 changelog:

  • Added support for the following GPU(s):
    • Quadro P3000
    • Quadro GP100
    • Quadro P4000
    • Quadro P2000
    • Quadro P1000
    • Quadro P600
    • Quadro P400
    • Quadro M1200
    • Quadro M2200
  • Disabled OpenGL threaded optimizations by default under Xinerama.
  • Added support for the ARB_parallel_shader_compile extension to allow multi-threaded compilation of GLSL shaders.
  • Updated the X driver to ignore any Virtual Reality Head Mounted Displays (HMDs). See the “AllowHMD” X configuration option in the README for details.
  • The driver will now advertise GLX FBConfigs with no depth bits on depth 30 X screens.
  • Added support in nvidia-settings to view configured PRIME displays. To enable PRIME displays, see “Offloading Graphics Display with RandR 1.4” in the README.
  • Added infrastructure which enables the NVIDIA EGL driver to load EGL external platform libraries that add client-side support for new window systems, beyond the existing libnvidia-egl-wayland.so.1. For more details, see:
    • – https://github.com/NVIDIA/eglexternalplatform
    • – https://github.com/NVIDIA/egl-wayland
  • Added support for the following Vulkan extensions:
    • VK_KHR_display
    • VK_KHR_display_swapchain
  • Enabled OpenGL threaded optimizations by default in the driver. Refer to the “Threaded Optimizations” section in the “Specifying OpenGL Environment Variable Settings” chapter of the README for details. These optimizations will self-disable when they are degrading performance. As a result, performance should be unchanged for many applications, and increased for those that benefit from threaded optimizations and were not already forcing them enabled.
  • Fixed a bug that prevented PRIME Sync from working on notebooks with GeForce GTX 4xx and 5xx series GPUs.
  • Fixed a bug that caused system hangs when resuming from suspend with some GPUs.
  • Fixed a regression that could cause corruption when hot-plugging displays.
  • Fixed a regression that prevented systems with multiple DisplayPort monitors from resuming correctly from suspend.
  • Added support for the screen_info.ext_lfb_base field, on kernels that have it, in order to properly handle UEFI framebuffer consoles with physical addresses above 4GB.
  • Added support for X.Org xserver ABI 23 (xorg-server 1.19)
  • Fixed a bug that allowed nvidia-installer to attempt loading kernel modules that were built against non-running kernels.

Download & Install NVIDIA 378.13:

The official .RUN installers for x86, x86_64, ARM, and other architectures are available for download at the link below:

NVIDIA Unix Driver Archive

The “Graphics Driver” Team is maintaining a PPA with proprietary GPU drivers (378.13 is not ready at the moment, CHECK HERE).

1. Add the PPA via following command in terminal (Ctrl+Alt+T):

sudo add-apt-repository ppa:graphics-drivers/ppa && sudo apt update

Nvidia Driver PPA

2. Then 378.13 driver WILL be available soon via Additional Drivers utility:

nvidia-378-drivers

In addition:

For some video cards, there may be a black screen issue after installing NVIDIA proprietary GPU drivers. Try either setting NOMODESET in grub option, or removing the proprietary driver via command:

sudo apt-get purge nvidia-current

You may need to boot into recovery mode -> root prompt, or press Ctrl+Alt+F1 on login screen to get into command console.

The post NVIDIA Driver 378.13 Released, Allow to View Configured PRIME Displays appeared first on Tips on Ubuntu.

QtWebEngine Browser QupZilla 2.1.1 Released with Fixes

$
0
0
QupZilla 2.1.1

The fast and lightweight QupZilla QtWebEngine web browser has reached the 2.1.1 release days ago with some fixes.

QupZilla is a new and very fast QtWebEngine browser since version 2.0. It aims to be a lightweight web browser available through all major platforms. This project has been originally started only for educational purposes. But from its start, QupZilla has grown into a feature-rich browser.

QupZilla 2.1.1 is a small release with following changes:

  • updated translations
  • fix loading previews in SpeedDial
  • fix showing duplicated languages in spellcheck settings
  • fix sometimes pages being scrolled by itself when using native scrollbars
  • fix disabling GreaseMonkey scripts
  • Windows: fix highlight text color in item views

Download QupZilla:

QupZilla 2.1.1 requires Qt5 >= 5.8. So far the only way to run it in Ubuntu is using the AppImage:

Download QupZilla 64bit AppImage

The AppImage is a non-install file, just make it executable from its Properties window:

make qupzilla executable

Then run the file from its context menu will bring up QupZilla browser:

run qupzilla appimage

If you don’t see the ‘Run’ option, go to menu of Nautilus file browser Edit -> Preferences -> Behavior -> Check the line says “Run executable text files when they are opened”.

The post QtWebEngine Browser QupZilla 2.1.1 Released with Fixes appeared first on Tips on Ubuntu.

How to Install MPV Media Player 0.24 in Ubuntu 16.04, 16.10

$
0
0
mpv-media-player

MPV media player, a fork of MPlayer / MPlayer2, has reached the 0.24 release. Here’s how to install it in Ubuntu 16.10, Ubuntu 16.04, Ubuntu 17.04, and their derivatives.

mpv was forked in 2012 from mplayer2, which was forked in 2010 from MPlayer. The motive for the fork was to encourage developer activity by removing unmaintainable code and dropping support for very old systems. As a result, the project had a large influx of contributions.

mpv carries a large amount of changes since it was forked from MPlayer. The most user visible change is the new on-screen-controller (OSC) which is a minimal GUI integrated with mpv to offer basic mouse-controllability. It is intended to make interaction easier for new users and to enable precise and direct seeking.

What’s New in mpv 0.24:

  • add experimental C plugin interface
  • add experimental stream recording feature
  • add prefetching of the next playlist entry
  • VA-API now supports 10-bit video formats
  • X11 pseudo HiDPI scaling support.
  • fix high CPU usage under Wayland
  • improved OpenGL video output
  • and various other changes, see release note for details.

How to install mpv in Ubuntu / Linux Mint:

The new release has been made into PPA repository, available for Ubuntu 16.04, Ubuntu 16.10, Ubuntu 17.04, Linux Mint 18 and their derivatives.

1. Open terminal from app launcher or via Ctrl+Alt+T keys, when it opens, run command to add the PPA:

sudo add-apt-repository ppa:mc3man/mpv-tests

Type in password (no visual feedback) when it prompts and take a look at the ppa description in the terminal output.

mpv Ubuntu PPA

2. If you have a previous release installed on your system, launch Software Updater to upgrade mpv to the new 0.24 release:

upgrade mpv media player

Or you can run the following commands to install / upgrade the media player:

sudo apt update && sudo apt install mpv

How to Remove:

To uninstall mpv, simply run following command in terminal:

sudo apt remove mpv && sudo apt autoremove

And you can remove the PPA repository by launching Software & Updates utility and navigating to Other Software tab.

The post How to Install MPV Media Player 0.24 in Ubuntu 16.04, 16.10 appeared first on Tips on Ubuntu.

Viewing all 207 articles
Browse latest View live


Latest Images